The most important development resource for barcode recognition is the more than 100 GS1 Member Organizations in countries around the world. Through this article, we will guide you through creating new barcodes through the basic steps you need to take to start using barcodes.
Step 1: Register GS1 barcode
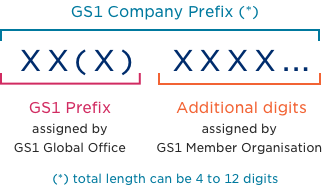
Before a company could start creating barcodes, they previously had to register the numeric code located inside the barcode, known as the GS1 Identifier. The first step in identifying GS1 codes is to obtain a Company Code from a GS1 Member Organization.
GS1 Company Numbers provide companies with a way to create identification keys for trade products, logistics units, locations, parties, assets, coupons, etc., that are unique worldwide. gender. GS1 Company Numbers have been used by 1.3 million companies worldwide as the basis for creating unique numbers to identify things in the chain of applications.
Step 2: Create product code
After receiving a GS1 Company Number, a company is ready to start assigning identifiers to commercial items (products or services), themselves (as a legal entity), locations, logistics units, individual company assets, returnable assets (pallets, crates, tubs) and/or service relationships. This process is very simple. Your local GS1 Member Organization can provide you with specific information on the number of numbers you can assign based on the length of your GS1 Company Prefix.
Step 3: Choose the barcode printing process
To start, you should decide what barcode you will create and whether the barcode will carry static or dynamic information inside.
If the information is static (always the same), the barcode can be printed with a traditional printer directly on the packaging (e.g., a paper milk carton) or on a label affixed to the packaging (e.g., a label on a bottle). gallon milk container).
If the information is dynamic, digital printing or a combination of digital and traditional printing will be needed.
For example:
If the product requires multi-color graphics and barcodes with dynamic data, the graphics can be pre-printed using a traditional printer and leave a blank label section for direct digital printing during production and packaging. package.
If the product only requires text and a barcode with dynamic data, the label can be printed online and applied to the packaging (automatically if high volume or manually if low volume). Labels can also be printed directly on the packaging itself without using labels.
Additionally, barcodes with static data can be printed directly on the packaging using digital printing, for example when the same packaging is used for many different products.
Printing method
- Traditional: flexography and offset
- Digital: thermal and laser
- Direct marking: e.g. engraving, engraving
Step 4: Choose a barcode scanning environment
Specifications for barcode type, size, location, and quality all depend on where the barcode will be scanned. By knowing where your barcodes will be scanned, you can establish the appropriate specifications for barcode production.
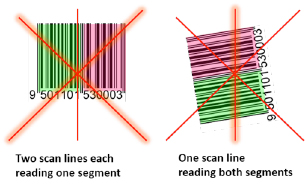
Barcodes scanned at current retail locations need to support omnidirectional scanning.
If barcodes are scanned at the point of sale as well as in the warehouse, you will need to use a symbology suitable for point of sale scanning but printed at a larger size to accommodate scanning during distribution .
Barcodes on healthcare items scanned at hospitals and pharmacies do not require omnidirectional scanning unless those items are also scanned at the retail point of sale.
- Scanning environment
- Point of sale
- Distribution and general logistics
- Health care items
- Mark parts directly
Step 5: Select barcode
Choosing the right barcode is important to the success of your barcode implementation plan, but here are some helpful tips:
If you need to barcode a commercial item that will be scanned at the retail point of sale (POS), the first symbol to choose is the EAN/UPC symbol. This symbol is guaranteed to be scanned by POS systems worldwide. In some cases, GS1 DataBar symbology or GS1 standardized 2D symbology may be applied.
If you are printing barcodes with variable information such as serial numbers, expiration dates, or measurements, you will use GS1-128, GS1 DataBar, or standardized 2D symbols.
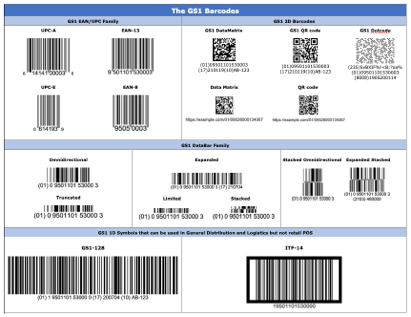
If you want to encode a URL into a barcode to provide extended packaging information to the end consumer, then you should use GS1 standardized 2D symbology.
If you need barcodes for outer shells to scan in a logistics environment and want to print directly onto corrugated cardboard boxes, GS1-128 or ITF-14 may be the choice for you.
There are many other factors to consider so contact your local GS1 Member Organization to see what products and implementation services they offer.
Step 6: Choose barcode size
Once the correct barcode symbology is specified along with the information to be encoded in it, the design phase begins. The size of the symbol in the design will depend on the symbol being specified, where the symbol will be used, and how the symbol will be printed.
Icon size
X-dimension is the specified width of the narrowest element of the barcode. The X-dimension is used in conjunction with symbol height to specify allowable symbol sizes.
For each scanning environment, the relevant symbols are listed with the corresponding target X-dimension and target height. Besides the target size, the minimum and maximum allowed sizes are also specified.
EAN/UPC symbol
The EAN/UPC symbol is designed to be scanned by a retail omnidirectional scanner. This means that the EAN/UPC Symbol is two segments taller than it is wide. There is a fixed relationship between the height and width of an icon. When one dimension is modified, the other dimension must also be changed by a corresponding amount.
To reduce the amount of space that the EAN/UPC Symbol takes up on the design, a reduced symbol height can be specified. This process, called truncation, is not allowed in the EAN/UPC symbology specifications and should be avoided. This is due to its negative impact on scanning speed for retail omnidirectional scanners.
Omnidirectional
EAN/UPC barcodes are suitable for omnidirectional scanning because fixed scanners can read barcodes from all directions.
Consider the printing process
The final major consideration for symbol size is the capabilities of the selected printing process. The exact minimum size (magnification) and Bar Width Reduction (BWR) for a symbol vary depending on the printing process. Printing companies should establish minimum symbol size (magnification) and BWR to achieve acceptable and repeatable quality results.
Step 7: Format barcode text
The text that usually lies below the barcode, called the Human Readable Identification Number (HRI), is important because if the code is damaged or of poor quality in the first place, then the text will be used as a copy save.
Here are some of the most frequently asked questions about HRI:
Does the human readable version need to be a certain size?
Human-readable text must be clear, legible, and sized proportional to the symbol size.
Is the human-readable interpretation above or below the symbol?
HRI should be placed below the barcode and grouped together wherever possible, while still ensuring legibility of the HRI and minimum barcode height.
I see parentheses around the Application Identifier (AI) below some barcode symbols. Are they supposed to be there and encoded in the barcode?
All AI must be enclosed in parentheses in the human-readable Interpretation, but parentheses are not encoded in the notation.
How many digits do I typically print below the EAN/UPC Symbol in visually readable text?
- You must print 12 digits below the UPC-A Symbol.
- You must print 13 digits below the EAN-13 Symbol.
- You must print eight digits below the UPC-E and EAN-8 Symbols.
Step 8: Choose barcode color
The optimal color combination for good contrast in a barcode symbology is black bars with a white background. If you want to use other colors, the following may help you choose the right color:
GS1 barcodes require dark colored bars (e.g. black, dark blue, dark brown, or dark green).
Bars should always consist of a single line of color and should never be printed using multiple imaging tools (e.g., plate, screen, cylinder, etc.).
GS1 barcodes require a light background for the Blank Area (the unprinted area around the barcode) and white space (e.g. white).
In addition to a light background, the color “red” can also be used. If you’ve ever been in a dark room with red light and tried to read red copy, you know that it can almost disappear.
The same is true for similar colors like orange, pink, peach, and pale yellow.
In many cases, the symbol background is not printed and the color of the packaging substrate is used as the barcode background. However, if the symbol background is printed below the bars, the background must be printed as a solid line.
If you use multiple layers of ink to increase background opacity, each layer must be printed as a single color.
If you use a smooth screen to deliver more ink to the surface, make sure there are no gaps in the print due to the screen not filling it fully.
Step 9: Choose where to place the barcode
When discussing symbol placement, we are referring to symbol placement on the design.
When assigning symbol positions, it is necessary to first consider the packaging process. You should consult a packaging engineer to ensure the logo is not obscured or damaged (e.g. on carton edges, below carton folds, under package flaps or covered by another layer of packaging).
Once a suitable placement has been determined, the printing company should be consulted. This is because many printing processes require barcodes to be printed in a specific orientation to optimize the printing process.
To determine the appropriate location for GS1 barcodes, see the following topics in the GS1 General Specifications:
General guidelines for location for point of sale
Placement instructions for specific package types
Iconic location for clothing and fashion accessories
GS1 logistics label design
The symbol position is used in the general distribution
Symbol location for regulated healthcare trade items
Step 10: Develop a barcode quality plan
ISO/IEC 15416 Barcode Printing Quality Testing Standard for Linear Symbols and ISO/IEC 15415 Barcode Printing Quality Testing Standard for 2D Symbols describe the following barcode symbology quality assessment methods when they are printed. An ISO-based verifier looks at the symbology the way a scanner does but goes further by grading the quality of the symbology.
The GS1 Barcode Standard uses ISO/IEC methods, specifying the minimum level required for every standardized GS1 code based on what symbology is used, where it is used, or what identifier the barcode belongs to. carry. In addition to the minimum level, GS1 also specifies the aperture width and wavelength of the verifier.